PI4 Stories
Raspberry Pi 4 cluster Series - Installation of Longhorn
Prepare our external USB block devices
On all our pi systems we added an USB block device of the same size and we are sure that they all put in the same USB port so that we are sure the all have the same block device name, e.g. /dev/sda
We have to be 100% sure that /dev/sda is our free USB device on which we want longhorn to become active on. Therefore, double check with ansible:
$ ansible pi -b -m shell -a "parted /dev/sda print"
n1 | CHANGED | rc=0 >>
Model:  USB  SanDisk 3.2Gen1 (scsi)
Disk /dev/sda: 61.5GB
Sector size (logical/physical): 512B/512B
Partition Table: unknown
Disk Flags: Error: /dev/sda: unrecognised disk label
...
We create an ansible playbook to prepare the USB block devices and have it mounted on /app/longhorn on each node. E.g.
$ df /app/longhorn/
Filesystem     1K-blocks  Used Available Use% Mounted on
/dev/sda1      117715864 61472 111631688   1% /app/longhorn
Using helm to perform the installation
If we want to use helm to performt the installation of longhorn we first need to install it as it isn't standard avaibale on these systems. Getting helm from URL https://helm.sh/docs/intro/install/.
$ curl -fsSL -o get_helm.sh https://raw.githubusercontent.com/helm/helm/master/scripts/get-helm-3
$ chmod 700 get_helm.sh
$ ./get_helm.sh
Helm v3.11.0 is available. Changing from version v3.7.1.
Downloading https://get.helm.sh/helm-v3.11.0-linux-arm64.tar.gz
Verifying checksum... Done.
Preparing to install helm into /usr/local/bin
helm installed into /usr/local/bin/helm
Alright, now we have the helm executable available on our local system (e.g. node n1). We can now download the helm longhorn chart repository:
$ helm repo add longhorn https://charts.longhorn.io
"longhorn" has been added to your repositories

$ helm repo update
Hang tight while we grab the latest from your chart repositories...
...Successfully got an update from the "longhorn" chart repository
Update Complete. ⎈Happy Helming!⎈
We need to be careful when we run the helm installer as we only want longhorn to use the USB block devices mounted at /app/longhorn and it should not be using the default location /var/lib/longhorn (as this might fill up the root partition).
Information on how we can actually do this can be found at "Adding Node Tags to New Nodes":
$ helm install longhorn longhorn/longhorn --namespace longhorn-system
  --set defaultSettings.defaultDataPath="/app/longhorn/" --create-namespace
NAME: longhorn
LAST DEPLOYED: Tue Jan 24 14:38:41 2023
NAMESPACE: longhorn-system
STATUS: deployed
REVISION: 1
TEST SUITE: None
NOTES:
Longhorn is now installed on the cluster!

Please wait a few minutes for other Longhorn components such as CSI deployments, Engine Images, and Instance Managers to be initialized.

Visit our documentation at https://longhorn.io/docs/
Prepare the longhorn-ingress (required for UI)
In-depth information about accessing the longhorn UI can be found at longhorn-ingress.
In short this is the procedure we followed:
$ USER=gdha; PASSWORD=*******; echo "${USER}:$(openssl passwd -stdin -apr1 <<< ${PASSWORD})" >> auth


$ cat auth
gdha:$apr1$XXXXXXXXXXXXXXXXXXXXXXXX

$ kubectl -n longhorn-system create secret generic basic-auth --from-file=auth
secret/basic-auth created

$ kubectl -n longhorn-system get secret basic-auth -o yaml
apiVersion: v1
data:
  auth: Z2RoYTokYXByMSRSTW11bU5oRSQyd3ZCMzNFM0hyLjY4aGZvL2xkVGsuCg==
kind: Secret
metadata:
  creationTimestamp: "2023-01-24T13:40:16Z"
  name: basic-auth
  namespace: longhorn-system
  resourceVersion: "13336"
  uid: eeb2bd1f-9cae-4460-916d-b26c7eb97b7e
type: Opaque
Then we paste the following set of yaml command lines into kubectl to create the longhorn-ingress:
$ cat longhorn-ingress.yaml
apiVersion: v1
items:
- apiVersion: networking.k8s.io/v1
  kind: Ingress
  metadata:
    annotations:
      nginx.ingress.kubernetes.io/auth-realm: 'Authentication Required '
      nginx.ingress.kubernetes.io/auth-secret: basic-auth
      nginx.ingress.kubernetes.io/auth-type: basic
      nginx.ingress.kubernetes.io/proxy-body-size: 10000m
      nginx.ingress.kubernetes.io/ssl-redirect: "false"
    creationTimestamp: "2022-02-01T11:41:47Z"
    generation: 4
    name: longhorn-ingress
    namespace: longhorn-system
    resourceVersion: "3312028"
    uid: bb838795-97d8-44e7-a3f1-4f74dd0854ee
  spec:
    rules:
    - http:
        paths:
        - backend:
            service:
              name: longhorn-frontend
              port:
                number: 80
          path: /
          pathType: ImplementationSpecific
  status:
    loadBalancer: {}
kind: List
metadata:
  resourceVersion: ""


$ kubectl create -f longhorn-ingress.yaml

$ kubectl describe ingress -n longhorn-system
Name:             longhorn-ingress
Labels:           <none>
Namespace:        longhorn-system
Address:
Ingress Class:    traefik
Default backend:  <default>
Rules:
  Host        Path  Backends
  ----        ----  --------
  *
              /   longhorn-frontend:80 (10.42.3.5:8000,10.42.4.6:8000)
Annotations:  nginx.ingress.kubernetes.io/auth-realm: Authentication Required
              nginx.ingress.kubernetes.io/auth-secret: basic-auth
              nginx.ingress.kubernetes.io/auth-type: basic
              nginx.ingress.kubernetes.io/proxy-body-size: 10000m
              nginx.ingress.kubernetes.io/ssl-redirect: false
Events:       <none>
Use the longhorn UI
As we have setup metallb with traefik [5] the longhorn-ingress is running is now available at IP address 192.168.0.230 and to test the connectivity we can use curl:
$ curl -v 192.168.0.230:80
*   Trying 192.168.0.230:80...
* TCP_NODELAY set
* Connected to 192.168.0.230 (192.168.0.230) port 80 (#0)
> GET / HTTP/1.1
> Host: 192.168.0.230
> User-Agent: curl/7.68.0
> Accept: */*
>
* Mark bundle as not supporting multiuse
< HTTP/1.1 200 OK
< Cache-Control: max-age=0
< Content-Type: text/html
< Date: Tue, 24 Jan 2023 16:11:19 GMT
< Etag: W/"63adbe68-401"
< Last-Modified: Thu, 29 Dec 2022 16:20:56 GMT
< Server: nginx/1.21.5
< Vary: Accept-Encoding
< Transfer-Encoding: chunked
<
<!DOCTYPE html>
<html lang="en">

<head>
  <meta charset="UTF-8">
  <meta name="viewport" content="width=device-width, initial-scale=1.0">
  <meta http-equiv="X-UA-Compatible" content="IE=edge">
  <!--[if lte IE 10]>
      <script
        src="https://as.alipayobjects.com/g/component/??console-polyfill/0.2.2/index.js,media-match/2.0.2/media.match.min.js"></script>
  <![endif]-->
  <style>
    ::-webkit-scrollbar {
      width: 10px;
      height: 1px;
    }

    ::-webkit-scrollbar-thumb {
      border-radius: 10px;
      -webkit-box-shadow: inset 0 0 5px rgba(0,0,0,0.1);
      background: #535353;
    }
  </style>
<link href="./styles.css?e0c09a3f2aae9c069d0c" rel="stylesheet"></head>

<body>
  <div id="root"></div>
<script type="text/javascript" src="./runtime~main.6d7bda24.js?e0c09a3f2aae9c069d0c"></script><script type="text/javascript" src="./styles.985bf912.async.js?e0c09a3f2aae9c069d0c"></script><script type="text/javascript" src="./main.c5723e73.async.js?e0c09a3f2aae9c069d0c"></script></body>

</html>
* Connection #0 to host 192.168.0.230 left intact
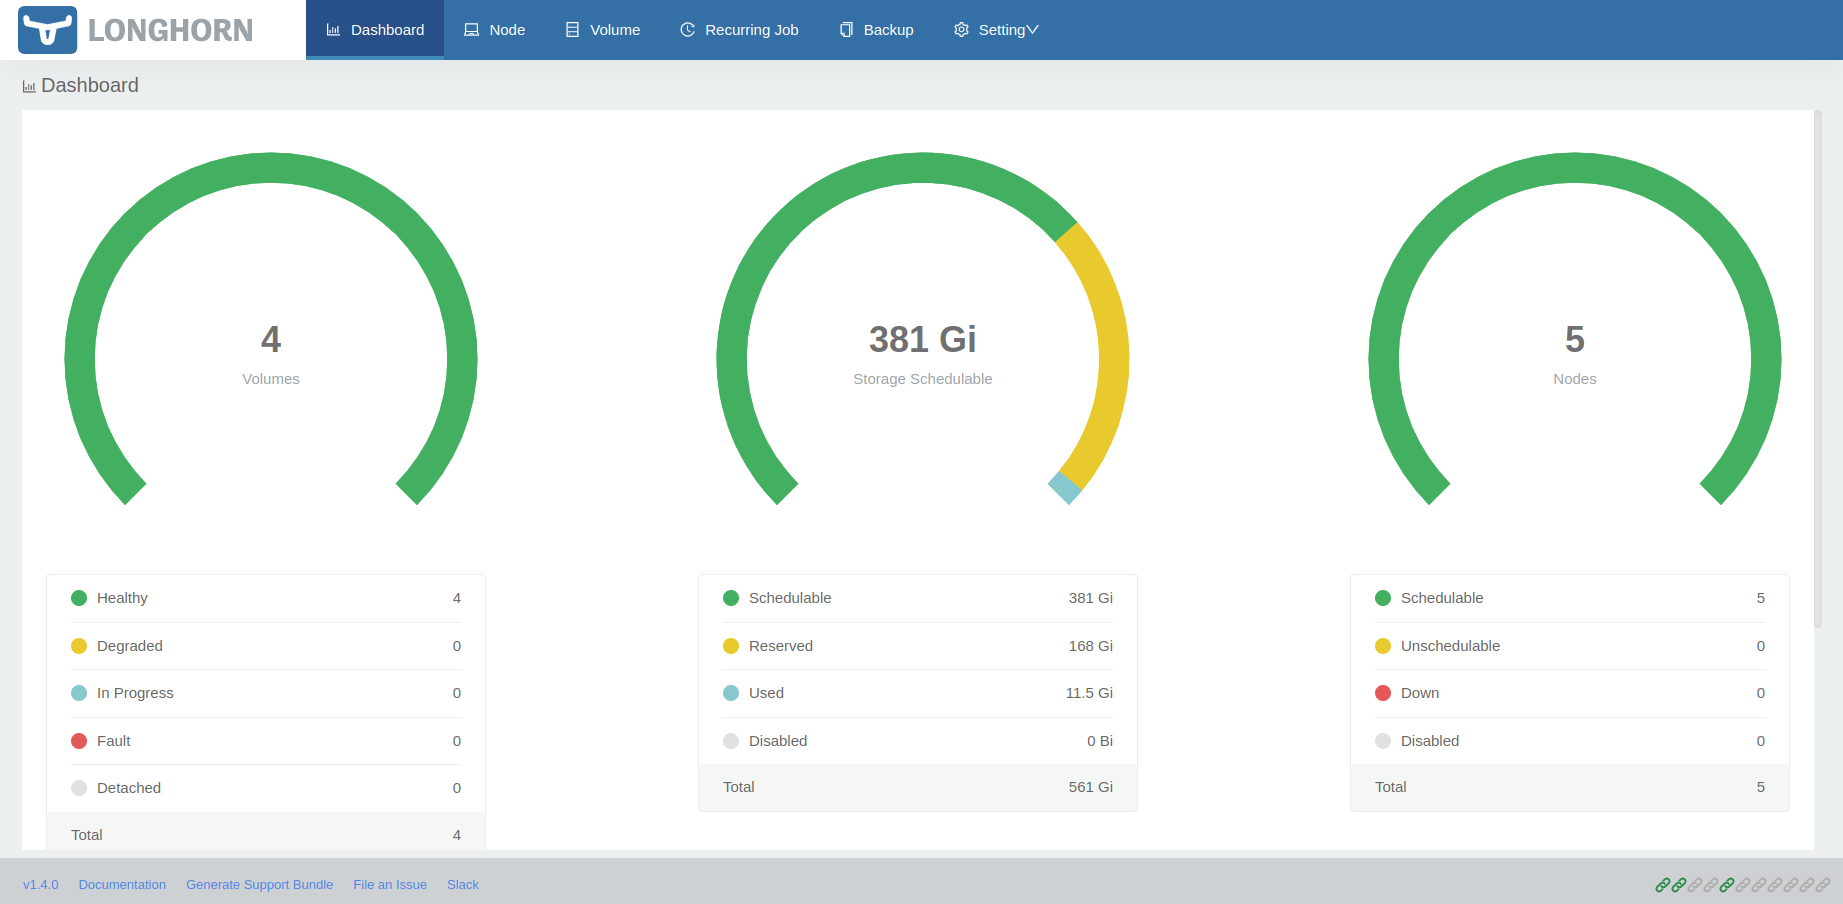
However, we a browser pointing to http://192.168.0.230/#/dashboard we get a better overview:
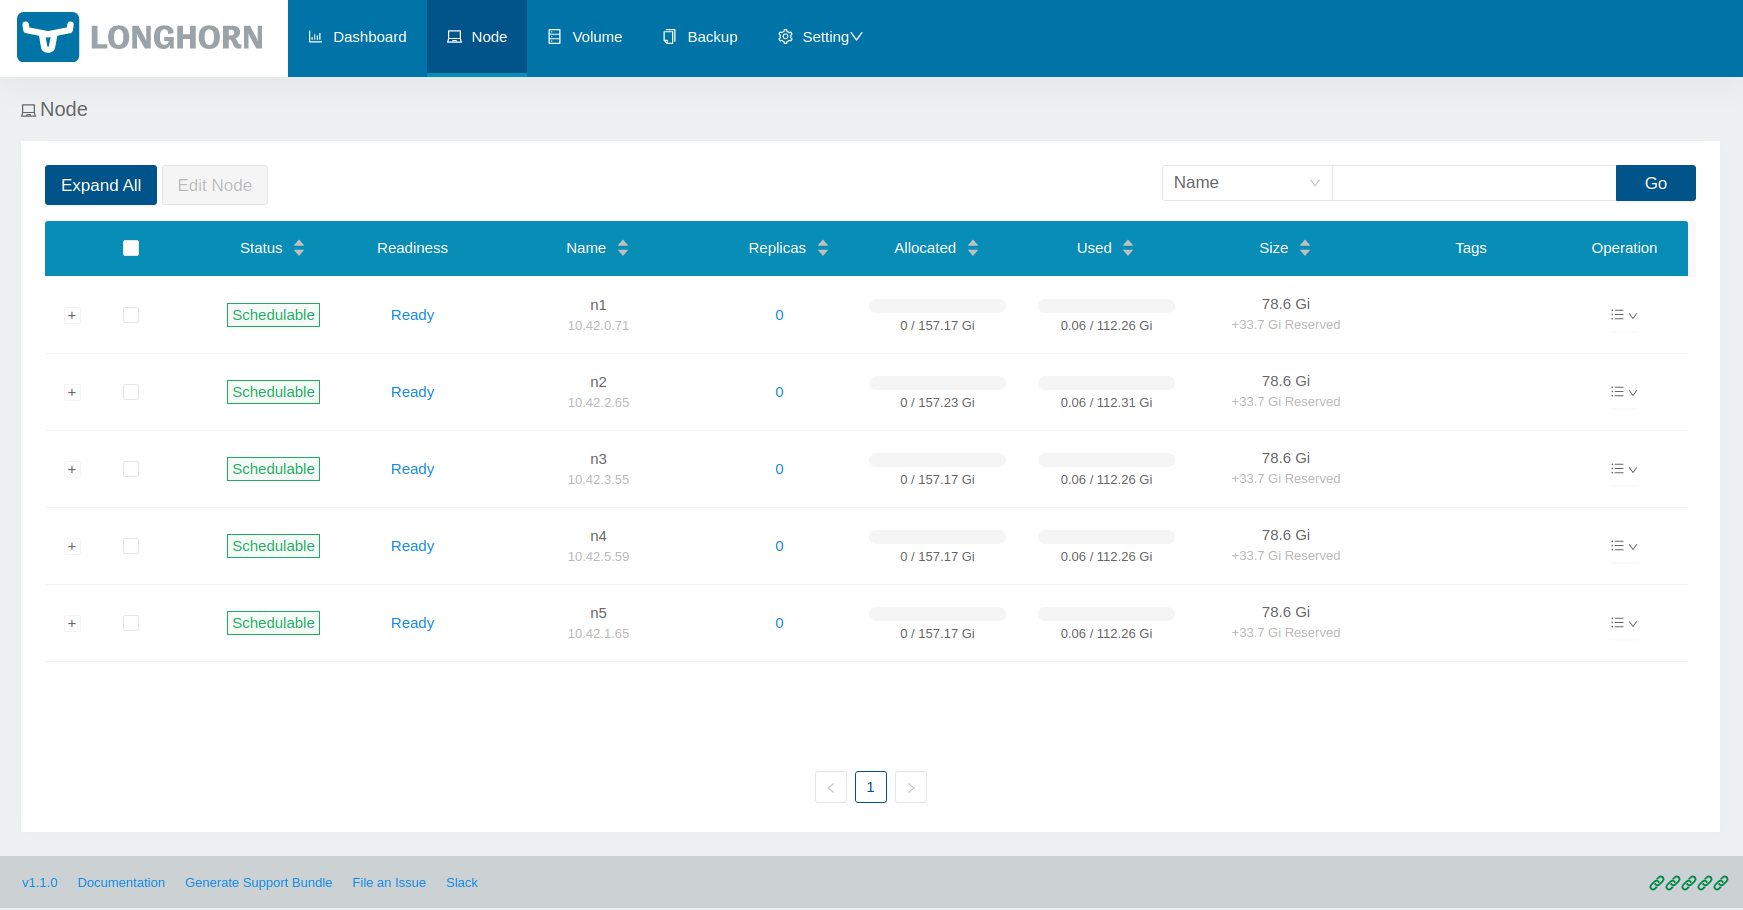
Or, when selecting the node tab:
And, the details of one node:

Upgrading longhorn version with the help of helm
We were running version 1.4.0 of longhorn and we wanted to upgrade to version 1.5.1. Here are the steps how we did this:
$ helm repo update
Hang tight while we grab the latest from your chart repositories...
...Successfully got an update from the "metallb" chart repository
...Successfully got an update from the "longhorn" chart repository
...Successfully got an update from the "kiwigrid" chart repository
...Successfully got an update from the "traefik" chart repository
...Successfully got an update from the "grafana" chart repository
Update Complete. ⎈Happy Helming!⎈

$ helm search repo longhorn
NAME                CHART VERSION   APP VERSION DESCRIPTION
longhorn/longhorn   1.5.1           v1.5.1      Longhorn is a distributed block storage system ...

$ helm upgrade longhorn longhorn/longhorn --namespace longhorn-system --version 1.5.1
Release "longhorn" has been upgraded. Happy Helming!
NAME: longhorn
LAST DEPLOYED: Fri Oct  6 08:31:36 2023
NAMESPACE: longhorn-system
STATUS: deployed
REVISION: 2
TEST SUITE: None
NOTES:
Longhorn is now installed on the cluster!

Please wait a few minutes for other Longhorn components such as CSI deployments, Engine Images, and Instance Managers to be initialized.

Visit our documentation at https://longhorn.io/docs/

$ kubectl get pods -n longhorn-system -w
It will take a couple of minutes to upgrade the longhorn manager and then you can refresh the longhorn GUI window on your browser and you will see in the left down corner the correct (new) version number. However, please note that each volume will show on the left side an upper arrow indicating that there is an action waiting:

Select a volume and on the right side you can pick the "upgrade engine" option; select the available longhorn engine version and click ok. Do this for each volume you have:

References
[1] Ansible playbook to prepare USB devices
[2] Longhorn
[3] Adding Node Tags to New Nodes
[4] Accessing Loghorn through UI
[5] Replacing internal traefik with Metallb
Edit history
- update for longhorn version 2.4.0 (24/Jan/2023)